

Looking for a curtain sewing pattern to perk up the top of any curtain panel or valance with details that go beyond the basic rod pocket or hanging tabs? You’ll find some options below. Whether you want to showcase a coordinating lining fabric with reverse tabs that wrap over the drapery rod or create unique tabs, get a curtain sewing pattern that’s guaranteed to add a designer look to your window.
REVERSE SCALLOP-TOP CURTAIN SEWING PATTERN

Materials for the Reverse Scallop-Top Curtain Sewing Pattern
Note: Each panel is 53 x 56 inches as shown; adjust length and width as desired for your window. To plan yardage for a different curtain length, measure from the top of the mounted drapery rod to the desired length and add 10 inches for hems and top treatment.
- 2 yards each of two 54-inch-wide decorating fabrics (coordinating prints) for each finished panel
- Scraps of coordinating solid-color fabric for button covers
- 12 (7/8-inch-diameter) button forms for covered buttons
- 12 (3-inch-long) tassels with hanging loops
- 11/4-inch-diameter or smaller drapery rod
- Pattern tracing cloth or paper
- Permanent fabric adhesive
- 1/4-inch-wide double-stick fusible web tape
- All-purpose thread to match fabric
- Contrasting 12-weight cotton thread for topstitching tabs
- Size 14 or 16 universal or topstitching sewing machine needle
- Button thread or buttonhole twist and beeswax
- Large-eye hand-sewing needle
- Basic sewing tools and equipment
Cutting Instructions for Reverse Scallop-Top Curtain Sewing Pattern
- Cut each decorator fabric panel to 66 inches (or the desired finished length plus 10 inches).
- Cut a 12 x 54-inch strip of pattern tracing cloth or tracing paper.
- Enlarge the scallop pattern (Figure 1) and trace onto the cloth or paper, tracing six scallops across the length of the paper. Cut out the pattern. For other curtain widths, you will need to add or subtract scallops or adjust the width of the pattern given to fit full scallops across the panel.

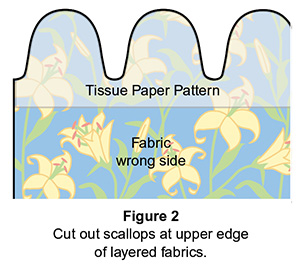
- Layer the decorator fabric panels for each curtain on a flat surface with right sides together. Center the scallop pattern along the upper edge of the panels with the curves toward the edge (Figure 2). Trace around the scallops. Cut out both layers along the traced lines.
- From the solid fabric, cut (12) 2-inch-diameter circles to cover the buttons.
- Assembly for Reverse
Scallop-Top Curtain Sewing Pattern Instructions
Use ½-inch-wide seam allowances.
- Sew the two panels together along all edges, leaving a 10-inch-long opening for turning in the lower edge. Trim and clip the curves and corners; turn right side out and press, turning in the opening edges. Slipstitch the opening edges together.
- Fold the scalloped edge to the curtain right side so the scalloped section measures 9 inches from the top to the lower edge of the scallops. Pin in place across the upper edge.
- Apply short lengths of fusible web tape to the underside around the scalloped edges and fuse the scallops in place following the manufacturer’s directions.
- Thread the sewing machine needle (size 14 or 16) with contrasting 12-weight thread and topstitch the scallops in place, stitching ¼ inch from the finished edge.
- Cover the buttons with the contrasting fabric circles following the package directions.
- Wax the button thread or buttonhole twist (see Snip-It on page 78) and use to sew a button in the center of each scallop 1 inch above the lower finished edge. For the easiest sewing, insert both thread ends though a large-eye hand-sewing needle and stitch through the fabric from front to back. Knot the thread ends several times and trim the excess thread.
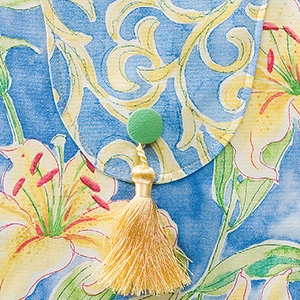
- Hang a tassel loop over each button. Twist the loop cords slightly and glue together using a very small amount of fabric adhesive.
- To hang the panels, insert the drapery rod through the pocket above the stitched-down scallops.
ROUND ‘EM UP TOPPER SEWING PATTERN
Round ‘Em Up Curtain Sewing Pattern Materials
- Novelty cowboy print curtain panel(s) in length to fit window with upper edge unfinished
- 3½-inch-wide strip of suede or nonwoven faux-suede in a length equal to the finished width of the curtain panel
- 1¾ x 2¾-inch metal conchos (determine required number in step 1)
- 2 (16-inch-long) pieces of leather lacing for each concho
- Leather branding tool with star attachment
- Permanent fabric adhesive
- Self-adhesive, double-sided basting tape
- Basic sewing tools and equipment
Assembly for Round ‘Em Up Curtain Sewing Pattern
- To determine the number of conchos needed, measure the curtain panel width. You will need one concho for each outer edge. Mark the outer edge positions 1 inch in from the finished edges, and then determine the number that will fit between them with approximately 5 inches of space between conchos. Adjust this spacing as needed and mark the concho positions on the curtain panel wrong side.
- Align the ends of two pieces of lacing at each mark at the upper raw edge on the wrong side of the curtain panel. Stitch in place a scant ½ inch from the raw edge.
- With raw edges even and the right side of the suede strip against the wrong side of the curtain panel, stitch ½ inch from the raw edges, catching the leather lacings. Use basting tape within the seam allowance to hold the layers together for stitching. Do not use pins on the suede because they will leave permanent holes.
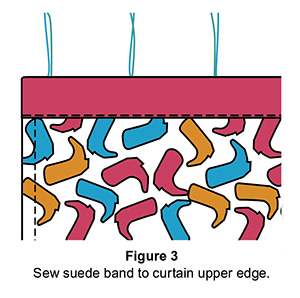
- Turn the suede strip to the right side of the curtain panel and press with a warm iron from the fabric side at the upper edge, not on the suede. Use basting tape on the underside to secure the lower edge of the suede strip to the curtain for stitching. Stitch close to the lower edge of the strip (Figure 3).
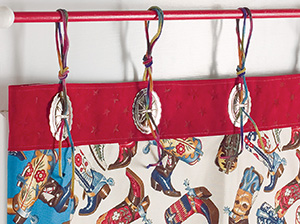
- Center the conchos on the suede strip with each concho center directly below the leather laces. Use fabric adhesive to glue the concho edges in place and allow to dry completely.
- To emboss the suede strip, work on an ironing board or other heatresistant surface. Attach the star stamp to the branding tool and plug the tool into an electric outlet. Press the heated tool firmly onto the suede and lift straight up. Repeat to emboss stars as desired around the conchos.
- To make the hanging loops, form each one and tie an overhand knot, adjusting so all loops are the same length across the curtain panel. Thread the ends through the concho center.
- Slip the leather loops over the curtain rod and adjust the curtain fullness as desired.
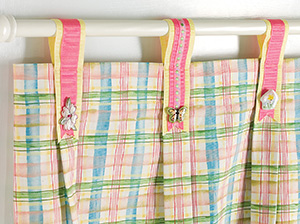
BUTTONED-RIBBON TAB TOPS CURTAIN SEWING PATTERN
Materials for the Buttoned-Ribbon Tab Tops Curtain Sewing Pattern
- Curtain panel with unfinished upper edge (see Note below for sizing)
- Ribbon (determine yardage in step 2) 11/4-inch-wide grosgrain: 9 inches for each tab 7/8-inch-wide grosgrain: 9 inches for each tab 1/4-inch-wide decorative ribbon: 9 inches for each alternate tab
- Porcelain or other decorative buttons (1–11/4-inch-diameter), one for each tab
- 1/4- and ½-inch-wide double-stick fusible web tape
- Liquid seam sealant
- All-purpose thread to match fabric and ribbons
- Basic sewing tools and equipment
Note: In addition to the bottom hem allowance, add 3 inches for the selffacing at the upper edge. Determine the desired finished panel width and then add 1½ inches for side hems and an additional 2½ inches per pleat.
Assembly for Buttoned-Ribbon Tab Tops Curtain Sewing Pattern
- Turn under and press 3 inches at the upper unfinished edge of the curtain panel. Turn under and press ½ inch at the raw edge. Pin in place and stitch ¼ inch from the hem edge. Turn under and press ½ inch at each side, and then turn and press an additional 1-inchwide hem. Edgestitch in place
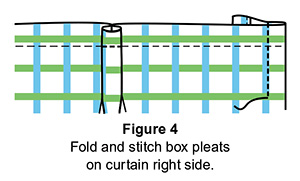
- Determine the number of tabbed pleats that will fit across the panel. The box pleats should finish to 1¼ inches wide. Plot the pleat locations with the outermost pleats located 1½ inches from the finished side edges and approximately 4½– 5 inches between the pleat edges. Note the number of pleats required to determine how many buttons and how much yardage of each ribbon you will need for the loops. Note: Every other loop in the sample has three ribbons and the alternate loops only two ribbons. You may use one, two or three ribbons for the loops as you wish for the desired finished effect.
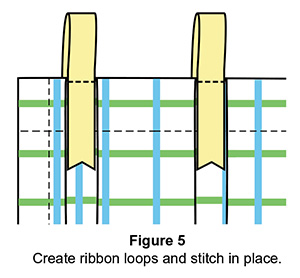
- Cut the ribbons into 9-inch lengths. To assemble each tab, fuse ½-inchwide fusible web tape to the center of the 7/8-inch-wide ribbon. Remove the paper backing from the strip and center and fuse the ribbon to the 1¼-inchwide ribbon. On half of the ribbons, repeat to apply the ¼-inch-wide ribbons on top of the second ribbon. Trim the end of each ribbon as shown in Figure 5.
- Pin each tab to a pleat with the points of the shaped end 3½ inches below the curtain upper edge. Turn the remaining ribbon under to form a loop that is 2¼ inches deep; pin the short end in place on the underside of the curtain. Stitch across each ribbon ¼ inch from the upper edge of the curtain panel (Figure 5). Treat the cut ends of the ribbon on the underside of the curtain with seam sealant to prevent fraying.
- Sew a button to the lower edge of each tab.
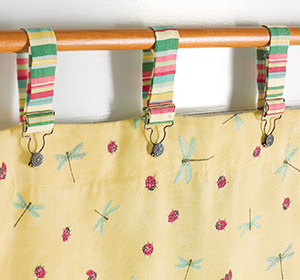
BUCKLE ME UP TAB TOPPER CURTAIN SEWING PATTERN
Materials for the Buckle Me Up Tab Topper Curtain Sewing Pattern
- Curtain panel with unfinished upper edge (side and bottom hems completed)
- Matching fabric facing strip, 4 inches wide and the length across the panel width plus 1 inch for turn-under allowance
- 3 x 14-inch fabric strip for each tab (determine required number in step 1)
- Overall buckle with button for each tab
- All-purpose thread to match fabric
- Basic sewing tools and equipment
Assembly for Buckle Me Up Tab Topper Curtain Sewing Pattern
- To determine the number of tabs you will need, measure the width of your curtain panel. Plan for one tab 1½ inches from each finished side edge, and then evenly space tabs 5–6 inches apart across the upper edge. Mark tab placements on the curtain panel right side at the upper edge.
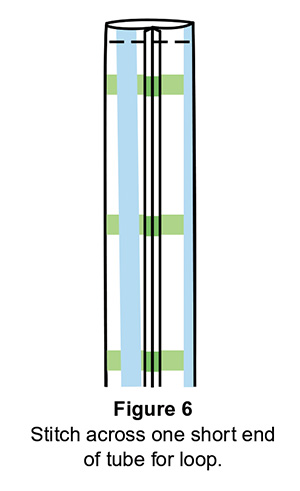
- To make each tab, fold the fabric strip in half lengthwise with right sides facing. Stitch ¼ inch from the long raw edges. Adjust the strip so the seam is centered in the strip and stitch across one short end (Figure 6).
- Turn right side out and press. With the raw edges even and the seam against the curtain right side, center each tab over a placement line. Machine-baste a scant ½ inch from the raw edges.
- With right sides together, sew the facing strip to the upper edge of the panel. Turn to the wrong side and press, turning under ½ inch at each short end. Stitch close to the folded edges.
- Follow the buckle manufacturer’s instructions to attach a button below each tab 1½ inches from the curtain panel upper edge.
- Thread the raw end of each tab through a buckle and adjust so all loops are the same desired length. Machinestitch the end in place or use fusible web tape to secure the end.
- Snap the buckle over the button and slide the loops onto the curtain rod.
Top It Off: Ideas to Spice Up Your Curtain Sewing Pattern
Looking for more upper-edge embellishment ideas for your curtain sewing pattern? Consider adding grommets or buttonholes to the header of a panel in your curtain sewing pattern, then tying them in place with lace, ribbon, cord or fabric ties. You can even make extra-long buttonholes and thread a narrow rod through them. How about hanging options for your curtain sewing pattern other than drapery rods? Attach knobs, hooks or drawer pulls to a window frame or the wall above a window and hang the tabs over them.
Or, cover buttons and sew them to the top of a lined panel with a flipped over edge. Sew a thread loop to the wrong side of the fabric behind each button and hang the loops on nails.


One Response to Tip-Top Curtain Sewing Patterns for Toppers by Carol Zentgraf