

Take your card making skills to a new level and craft show-stopping greeting cards with the creative, spotlight technique.
In this article our focus will be on card making’s spotlight technique, which had its beginnings in the stamping arena and the art world. To describe the spotlight technique in context to rubber stamping, a portion of a stamped image is manipulated to bring emphasis to that part of the design, somewhat like a spotlight on a stage highlights a specific performer.
This card making technique is frequently seen in home decor pieces, where a portion of a canvas image is highlighted and repeated, and then adhered on top of that same portion on the original canvas. It is also evident in the advertising world when a small identical pull-off coupon or booklet is placed on top of the original image. This is done so that once the pull-off piece is removed, a full and complete image remains. For card making this is not our motivation; however, it could work beautifully, if your card were to include a gift element such as a removable magnet or bookmark.
Getting Started with Spotlight Technique in Card Making
To spotlight a rubber-stamped image, the first step is to stamp the image twice (Fig. A).
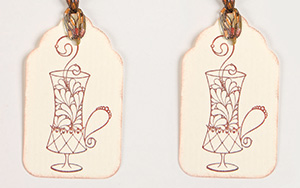
Figure A
Choose the desired area of the image to be spotlighted and cut it out using a punch, die- or shape-cutting system (Fig. B).

Figure B
Layer the punched portion onto the original image lining it up exactly with the bottom image (Fig. C).
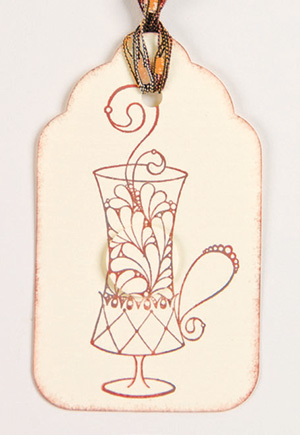
Figure C
To go beyond the basics, color the punched or die-cut spot using markers, inks, chalks, colored pencils or glitter glue (Fig. D).
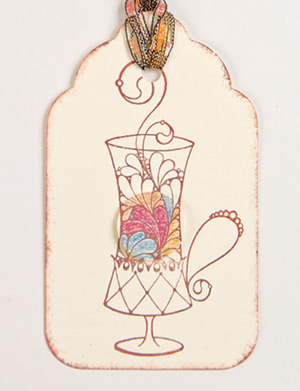
Figure D
To craft a reverse spotlight, punch the shape from one stamped image, and instead of layering the punched piece onto the second stamped image, layer the panel with the punched-out portion onto the original (Fig. E).
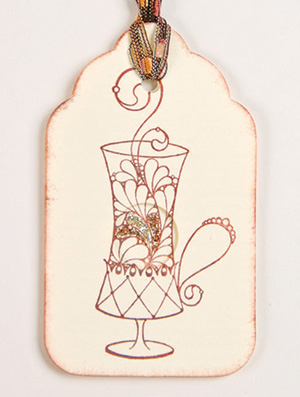
Figure E
Keep in mind that the shape of the spot does not have to be round. Make your spotlight piece for your next card making project truly original by considering one of the many shapes available such as squares, flowers, scallops, hearts, ovals and beautiful label shapes, to mention a few.
Getting Creative Using Card Making’s Spotlight Technique
In addition to the often-used rubber-stamp version, a variety of different mediums and supplies may be used to create spotlight card projects. Photos are one quick and easy option to consider. There are a couple of ways to work with photos to use the card-making spotlight technique, one being to use a black-and-white photo as the base, and then punch or die-cut a spotlight from a color photo and place on top. Spotlighting is a beautiful card-making technique to use with wedding and nature photos in particular.
The other spotlighting method to use with photos and card-making projects is to use two identical photos, creating a spotlight from one. Mat or layer the spotlight with card stock, leaving a small margin around the spot, and then layer onto the original photo. If you do not wish to mat with card stock, create emphasis around the spot by applying ink or a marker to the edges of the spot.
Inspiration for card making’s spotlight technique can also be found in the beautiful card stocks and papers available on the market today. Nothing is quicker than spotlighting an image that is already printed for you. Dictionary pages and music script are yet another interesting source of materials.
With the lovely embossing folders on the market, embossed designs are a snap to create, not like in the past where all the beautifully embossed card-making designs were painstakingly created by hand (Fig. F). Spotlight an embossed image or a portion of a full design (Fig. G). Color with chalks, colored mists, airbrushing and inks, or even try spotlighting the image in a contrasting color of card stock (Fig. H).
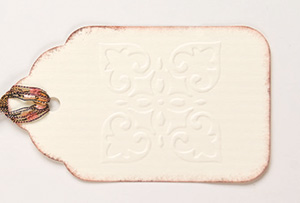
Figure F

Figure G
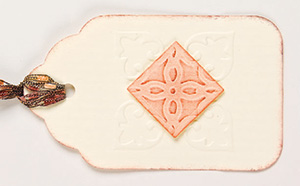
Figure H
Rub-on words or images are further sources of creating a spotlight in a card-making project. As before, two of the same images are needed. Follow the basic spotlight method as stated above and voilà! Your card-making design is on the way to spotlight bliss.
Embellishments add that little extra touch. Rhinestones and beads are a perfect addition to accent a spotlight on a card project. As the director, you are in charge of the spotlight and who or what is being spotlighted. Enjoy the process!
Circle of Friends Card Making Project, designed by Sharon Reinhart

Circle of Friends Card Project
Materials
- Card stock: shimmering cream, navy blue, brown
- Back Country double-sided printed card stock
- 14 1/2 inches 1/4-inch-wide brown grosgrain ribbon
- “friend” stamp
- Light brown chalk ink pad
- Branch punch
- Standard Circles SM die templates (#S4-116)
- Die-cutting machine
- Double-sided tape
- Adhesive foam dots
- Paper adhesive
Form a 5 1/2 x 5 1/2-inch side-folded card from cream card stock. Wrap ribbon around card front as shown; tie in knot, trim ends.
Cut a 4 1/4 x 5 1/4-inch piece of printed card stock; adhere to card front as shown. Choose area of printed card stock that will match area you want to spotlight on card front. Die-cut this piece of card stock by nesting together the 3 1/2-inch circle die template and the 2 1/8-inch circle die template to die-cut a 1 1/16-inch-wide ring. Adhere using foam dots to card front as shown.
Stamp “friend” onto cream card stock and cut out with a small border. Punch four branches: two from navy blue card stock and two from brown card stock. Adhere to back of “friend” rectangle; attach to card front with foam dots as shown.
Sources: Card stock from Bazzill Basics Paper Inc.; printed card stock from The Paper Loft; stamp from Magnetic Poetry Inc.; chalk ink pad from Clearsnap Inc.; branch punch from Martha Stewart Crafts; die templates from Spellbinders™ Paper Arts.
Hope Card Making Project, designed by Sharon Reinhart
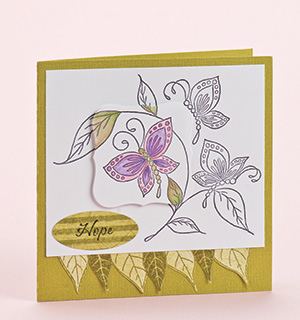
Hope Card Project
Materials
- Card stock: olive green, white smooth
- Botanicabella Birds In Paradise double-sided printed paper
- Transparency sheet
- Stamps: Spring Butterflies, “Hope”
- Black dye ink pad
- Glaze pens
- Small paintbrush
- Die templates: Petite Ovals SM (#S4-140), Labels One (#S4-161)
- Die-cutting machine
- Double-sided tape
- Foam mounting tape
- Paper Adhesive
Form a 5 1/2 x 5 1/2-inch side-folded card from olive green card stock.
Cut two 5 1/8 x 4 1/4-inch pieces of white card stock; stamp both with Spring Butterflies stamp.
Cut nine leaves from printed paper. Attach seven of the leaves to the bottom edge of one of the stamped rectangles. Adhere rectangle to card front as shown.
Determine area to spotlight on card front and die-cut image from remaining stamped piece, using 2 3/8-inch label die template. Color spotlight piece using glaze pens and watercolor method. Note: To watercolor using glaze pens, scribble desired pen color onto transparency sheet; dip paintbrush into water, then dip into ink from pen scribble. Color image as desired. Let dry.
Lining up stamped images exactly, adhere die-cut piece to card front with foam tape.
Die-cut a 2 x 7/8-inch oval from printed paper; stamp striped side of paper with “Hope.” Adhere to card front as shown.
Sources: Card stock from Bazzill Basics Paper Inc.; printed paper from Graphic 45; Spring Butterflies stamp from The Artful Stamper; “Hope” stamp from Stittsville Rubber Stamp Inc.; glaze pens from Sakura of America; die templates from Spellbinders™ Paper Arts.
A Little Bling Card Making Project, designed by Sharon Reinhart
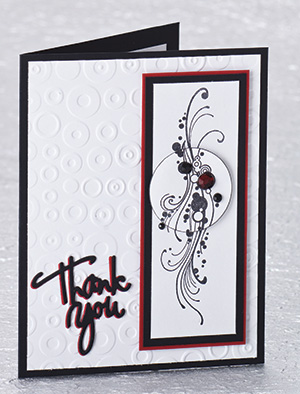
A Little Bling Card Project
Materials
- Card stock: black, white, red
- Wavy Line Flourish stamp
- Black dye ink pad
- Various-size self-adhesive rhinestones: 1 red, 3 black
- 1 1/2-inch circle punch
- With Gratitude die set (#37-1163)
- Spots & Dots embossing folder (#37-1145)
- Die-cutting and embossing machine
- Adhesive foam tape
- Paper adhesive
Form a 4 1/4 x 5 1/2-inch side-folded card from black card stock. Cut a 4 x 51/4-inch piece of white card stock. Emboss with embossing folder; adhere to card front.
Cut a 1 1/2 x 4 3/8-inch piece of white card stock; stamp with Wavy Line Flourish. Repeat on a second piece of white card stock. Cut a 1 3/4 x 4 5/8-inch piece of black card stock; adhere stamped rectangle to black rectangle. Adhere layered rectangle to red card stock; trim a small border. Using foam tape, attach layered rectangle to card front as shown. Punch a 1 1/2-inch circle from center of remaining stamped image; ink edges and accent with rhinestones. Using foam tape, attach over image on card front as shown.
Die-cut “Thank You” from red and black card stock. Adhere to lower left of card front, layering black “Thank you” over red.
Cut a 3 1/2 x 4 3/4-inch piece of white card stock; adhere inside card. Die-cut square “thanks” from black card stock. Adhere to white card stock; trim to a 1 7/8 x 1 7/8-inch square. Adhere to red card stock; trim a small border. Adhere to white card stock inside card.
Sources: Stamp from Inkadinkado; ink pad from Clearsnap Inc.; circle punch from Marvy Uchida; Cuttlebug die set, embossing folder, and die-cutting and embossing machine from Provo Craft.
Center Stage Card Making Project designed by Sharon Reinhart
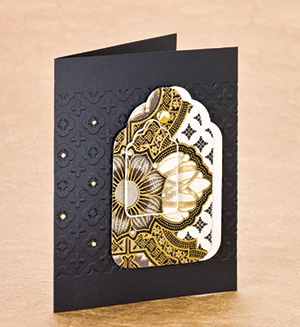
Center Stage Card Project
Materials
- Card stock: black, cream
- Fabric with repeating floral pattern
- Gold brad
- Gold pearlescent dimensional medium
- Large and small tag dies
- Moroccan Screen A2 embossing folder (#A2-37-1909)
- Die-cutting and embossing machine
- Hole punch
- Double-sided adhesive sheet
- Adhesive foam tape
- Paper adhesive
Form a 4 1/4 x 5 1/2-inch side-folded card from black card stock. Emboss center of card front with embossing folder, leaving a 3/4-inch border on top and bottom of card front. Accent some of the embossed motifs on left side of card front with pearlescent dimensional medium. Let dry.
Cut two 4 x 6-inch pieces of fabric with matching patterns. Adhere double-sided adhesive sheet to back of both pieces of fabric. Die-cut one large tag from one piece of fabric. Matching a portion of pattern in large tag, die-cut a small tag from other piece of fabric.
Die-cut a large tag from cream card stock.
Adhere large fabric tag to card-stock tag leaving a margin of card-stock tag showing on right side. Referring to photo, punch a hole through center top of large tags and insert brad. Adhere large tag to card front as shown with foam tape. Adhere small tag to cream card stock; trim a small border. Using foam tape, attach to large tag aligning patterns on fabrics as shown.
Sources: Liquid Pearls™ dimensional medium from Ranger Industries Inc.; Cuttlebug embossing folder, and die-cutting and embossing machine from Provo Craft.
