

This is my favorite method of inserting a simple-to-sew fly zipper. After you do it once or twice, I’m sure you’ll love it too. ~By Julie Johnson
Adjust for Your Simple-to-Sew Fly Zipper
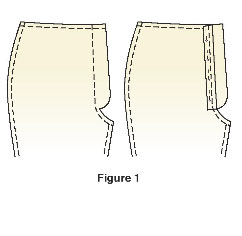
Examine your pattern to see what pieces are used in the fly construction. Some patterns have the fly facing cut as one with the pant front pattern. This is the easiest way to do a fly zipper. If the pattern has a separate fly facing, make it into one piece by overlapping the pant front pattern so the seam lines match. Pin the pieces together, and use this alteration when you cut the fabric (Figure 1).
Zipper Construction
Before unpinning the pattern from the fabric, on the wrong side of the fabric, mark the center front stitching line with a small clip at the top of the fabric, and mark the dot at the bottom of the zipper seam with a marking pen.
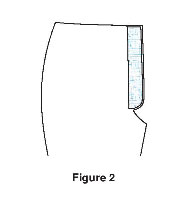
Separate the pattern from the fabric. Fuse a lightweight tricot interfacing to the wrong side of the left fly facing (Figure 2). The interfacing will stabilize the fly area and keep it smooth. If desired, use your pinking shears on the edge where the fly will fold. This will feather the edge and make a smoother transition. Mark the center front stitching line on the wrong side of the fly facing.
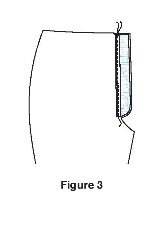
If you’re working with a knit fabric, you may want to edge-stitch twill tape next to the fold line on the left fly facing. This will stabilize the zipper area and help to keep the zipper area from stretching or distorting. This works well on lightweight wools too (Figure 3).
If there is front detail work to be done, do the detail work before you insert the zipper. But always put the zipper in before you sew any other seams.
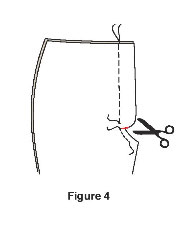
With the front pieces right sides together, machine-baste from the clip at the top of the fabric to the dot. Next, stitch the seam below the dot with a straight stitch, stopping 1 inch before the end of the seam. Clip to the seam line (Figure 4).
Women typically have the fly on the left, but there is no firm rule. The following instructions are for a left-side fly. If desired, substitute right for left if you want the fly on the right side.
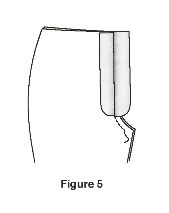
With right sides together, pull the right fly facing away from the garment front and press the seam open (Figure 5).
Use a zipper that is at least as long as the distance from the dot to the waistline seam. If using a longer zipper, the ends can be cut off after the waistband is added. I prefer to use a longer zipper, because I never have a problem with the zipper pull being in the way of the stitching.
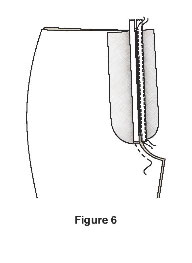
Place the zipper facedown on the right fly facing so the bottom of the stop is 1/4 inch above the dot. If you want the narrow fly finish shown in some pant patterns, position the zipper with the edge of the teeth along the center seam line. Make the regular-width fly finish by placing the left edge of the zipper tape along the center seam. Using a zipper foot, stitch the right zipper tape close to the teeth. Repeat along the outside edge of the tape (Figure 6).
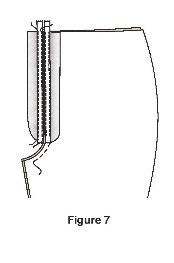
Turn the zipper over, right side up; pull it out to the side so that it faces up and press. Next, rearrange the pant front so that the left fly facing is pulled out to one side. Position the zipper face down on the left facing, making sure the zipper is pulled over as far as possible without distorting the fabric. Pin into place, and stitch down the left zipper tape just to the side of the teeth. Stitch again along the edge of the zipper tape (Figure 7).
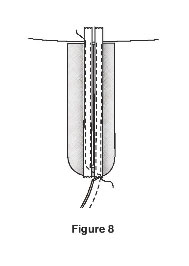
Open the pant front, place the pants with right side up on your ironing board. Fold over the fly facings onto the left side of the pant front, making sure they are pulled over as far as they can go, and pin into place. If your machine has good bobbin tension, it’s best to sew the next seam from the wrong side of the fabric. Stitch along the edge of the zipper tape, curving smoothly over to the center front line (Figure 8).
An alternative to a curved finish is to pivot the fabric under the needle at an angle just above the zipper stop and stitch in a straight line to the dot. Backstitch at the end of this seam for strength (Figure 9).
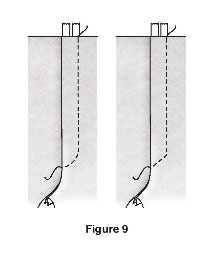
The final stitching can be done from the right side of the garment. too. First, baste along the edge of the zipper tape from the wrong side to secure. You can also try using glue stick to hold the two layers in place to avoid drag. Mark the stitching line with a marking pen, 11/4 inches from the fold for a wide fly finish, or 3/4 inch from the fold for a narrow finish. Topstitch down the side of the zipper, curve or angle the bottom of the fly to the center front taking care to sew below the zipper stop (Figure 9).
Lightly press the entire zipper assembly from the wrong side using a steam iron, then remove the center front basting. Wear and enjoy your simple-to-sew fly zipper.
