

Reap extra dividends from your sewing machine investment by using it to stitch the hems in the things you sew. After reading this article, you’ll have the basic whys and how-tos for how to sew a dozen different sewing machine-stitched options.
Yes, there is definitely a place for hand-sewn hems, but often the machine-stitched alternative looks better and is easier to execute. You’ve probably noticed machine-sewn hems are found on virtually all ready-to-wear fashions and decorator furnishings today, no matter how high the price tag.
When you tap the power of the sewing machine for hemming, you’ll create a finish that’s not only polished, but quick to sew, strong and durable, too. Among the dozen hem finishes shown here, you’ll find one that’s probably just right for your current sewing project.
1 HOW TO SEW A TOPSTITCHED HEM
This hem can be sewn on any straight-stitch machine model and suits a wide variety of fabrics. As an option, you can choose contrasting or decorative thread to make the hem an interesting detail. When sewing layette items or children’s clothing, feel free to substitute a decorative stitch pattern for the straight stitching.
- Finish the raw edge of the hem allowance with serging or zigzagging, or clean-finish it (turn under and press 1/4 inch, edgestitching if desired).
- Turn up the hem allowance width, press and pin in place. Place the pins parallel to the folded edge with the pinheads toward you so you can easily remove them as you topstitch close to the finished edge. If you serged or zigzagged the edge, position the stitching along the inner edge of the finishing stitches. If you turned and pressed the edge, stitch close to the fold (Figure 1).
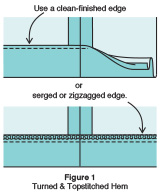
Optional: Sew a second row of stitching, if desired, placing it 1/4 inch below the first row. Use the edge of a sewing machine’s 1/4-inch presser foot to guide the stitches for even stitching.
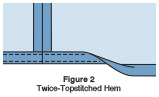
2 HOW TO SEW A TWICE- TOPSTITCHED HEM
This hem finish is traditionally used on jeans and other casual sportswear. While a single topstitched hem can be done with almost any hem allowance width, this one is traditionally used for narrower hems where a durable edge finish is desired. When working on a thick or stiff fabric such as denim, use a size 16 jeans needle on your sewing machine, which is designed to penetrate multiple layers of fabric.
- Allow for a 1-inch-wide hem allowance when cutting the pieces for a finished hem of 1/2 inch.
- Turn under and press the full width of the hem allowance (1 inch).
- Turn the raw edge under to meet the fold and press.
- Topstitch close to the lower and upper folded edges of the hem (Figure 2).
3 HOW TO SEW A TWIN-NEEDLE TOPSTITCHED HEM
Although not limited to use on knits, the twin-needle hem is a good one for this fabric type because it has some built-in give. Purchase a twin needle for your sewing machine — two needles attached to each other with a crossbar and a single shank. In a single pass, this sewing machine needle sews two perfectly parallel rows of topstitching while the bobbin thread forms a zigzag on the underside that links the two rows, adding a little give to the stitching (Figure 3).
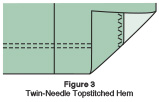
Twin sewing machine needles are available in several sizes and are labeled with two numbers, such as 2.0/80. The first number is the spacing between the needles, and the second is the needle size. Consult the sewing machine manual to learn how to set up your model with a twin needle and thread it correctly. If you are using this hem on a knit, there is no need to finish the raw edge of the hem allowance. For other fabrics, finish as desired (see choices in Topstitched Hem).
- Turn and press the hem allowance.
- Hand-baste the hem allowance in place 1/8 inch below the upper edge.
- Topstitch the hem in place, arranging it under the foot so that the stitching is inside the basting and equidistant from the folded edge all around. See Elastic to the Rescue below.
4 HOW TO SEW A FUSED & TOPSTITCHED HEM
Using a strip of fusible web makes this 1/2-inch-deep hem easy to accomplish. The finished hem gains extra stability and crispness from the fused layer and looks best on sturdy, woven fabrics and hem edges that are straight rather than curved or A-line. It is not recommended for lightweights or softly draped designs that rely on a fluid edge to achieve the desired look (Figure 4).
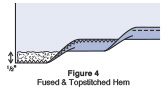
- Allow for a 1-inch-wide hem when cutting the pieces or trimming away any excess hem allowance.
- Apply 1/2-inch-wide fusible web along the cut edge of the hem allowance on the wrong side. Remove the protective paper on the fusible web, and then machine-stitch or zigzag it in place close to the hem allowance raw edge.
- Turn up a 1/2-inch-wide hem allowance and fuse in place following the manufacturer’s directions and using a press cloth as needed to protect the fabric.
- Turn the fused hem up again and press. Topstitch in place close to the inner folded edge.
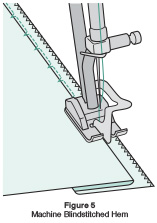
5 HOW TO SEW A MACHINE BLINDSTITCHED HEM
This hem looks almost invisible from the right side and is the household equivalent of the hemming stitch produced by an industrial specialty machine. Use it on garment hems and as a very practical timesaver when sewing the long, straight hems on the sides and bottoms of drapery panels and other flat home decor. Once you’ve mastered the trick of folding the fabric, sewing machine blindstitching is easy.
- Attach a special blindstitch presser foot to your sewing machine. This type of foot usually has a blade in between the toes to guide along the fold for even stitching.
- Select the built-in blindstitch on your sewing machine and adjust the stitch length and width as directed in your machine manual.
- Finish the raw edge of the hem allowance with a clean finish, serging or zigzagging.
- Turn under and press the hem allowance, and hand- or machine-baste in place 1/2 inch below the finished edge (or, pin it in place with pins 1/2 inch below and parallel to the finished edge; the blindstitches will form a safe distance away from the pins).
- With the project wrong side up, turn the basted hem under to the right side to expose the finished edge with a fold in the garment to the right (Figure 5).
- As you stitch along the fold, the sewing machine will make a series of straight stitches along the fold and then take a zigzag stitch that just barely pierces the fold (Figure 6).
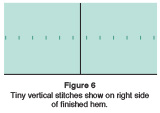
Note: When you’re finished blindstitching with your sewing machine and you unfold the hem, tiny vertical stitches will lie on the surface on the garment right side. They should be barely visible if the stitch has been adjusted correctly and you have used thread that is a close match to the fabric color (or invisible thread in the needle).
If the zigzag is set too wide for the fabric thickness, these stitches will be too obvious. If not wide enough, you may miss the fold entirely. For that reason, it is essential to test the stitch width and length on fabric scraps before you begin using your sewing machine to blindstitch on the actual sewing project.
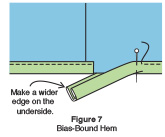
6 HOW TO SEW A BIAS-BOUND HEM
This neat, narrow hem is accomplished with purchased doublefold bias tape. Select a tape color that matches or accents the fabric color. You can use this style of hem on straight or curved edges, and it requires no extra fabric for a hem allowance. For easier handling on curved edges, steam-press the tape into a matching curve before applying it.
- Trim away the entire hem allowance.
- Encase the fabric raw edge with the tape so that the wider fold of tape is on the wrong side of the fabric. Make a neat join where the ends of the tape meet, positioning it away from a seam to avoid a noticeable lump.
- Sew close to the edge of the tape from the right side, stitching through all layers; the topstitching on the right side will catch the wider underlayer. Take your time arranging the tape to ensure that it is correctly positioned (Figure 7).
Elastic to the Rescue
When you need a guide for stitching widths beyond 3/4 inch, make an elastic “bracelet” that fits snugly around the free arm of your sewing machine.
- Use a piece of sturdy 1-inch-wide elastic and sew the ends together for a snug fit around the free arm on your sewing machine.
- Slip the bracelet over the free arm and position the left-hand edge of the elastic the desired distance from the needle. Then guide the fabric along the elastic. If you make the elastic bracelet fit snugly, it should stay put while you sew. If it doesn’t, use a piece of blue painter’s masking tape to hold the right-hand edge in place temporarily. When you don’t need the guide, simply slip to the right on the free arm as far as possible to move it out of the way.
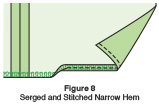
7 HOW TO SEW A SERGED & STITCHED NARROW HEM
Choose this hem for the lower edge of full skirts cut from lightweight fabrics. It is quick and easy and results in a soft hem finish without stiffness.
- Thread the serger with lightweight thread — rayon embroidery or cotton embroidery thread — in a color to match the fabric. Adjust the stitch so it is 1/4 inch wide and a length appropriate for the fabric. Test on a single-layer scrap of the fabric. Adjust the sewing machine’s differential feed, if available, for smooth, pucker-free stitching.
- Mark the hem and trim the excess hem allowance, leaving only 1/4 inch for the turn-up allowance.
- Serge-finish the cut edge, skimming away only a thread along the edge with the serger knife.
- Turn the serging to the inside and press. Stitch 1/8 inch from the turned-and-pressed edge (Figure 8).
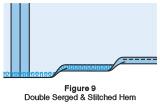
8 HOW TO SEW A DOUBLE SERGED & STITCHED HEM
For a slightly weightier hem finish, make a doubled narrow hem. This one makes a lovely finish on garments made from lightweight fluid or gossamer fabrics, or garments that have layered, floating panels as a design detail. Unlike the single-layer hem, the serging doesn’t show — making it a more visually pleasing finish for a hem that may show as the wearer moves in the garment.
- Complete steps 1–3 as directed for the Serged & Stitched Hem above.
- Turn and press the serged edge to the wrong side.
- Turn the serged and turned edge again and topstitch in place close to the inner fold (Figure 9).
9 HOW TO SEW A MACHINE ROLLED OR FLAT HEM
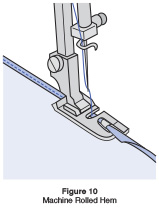
You’ll need a special flat hemmer or rolled-hem presser foot for your sewing machine to make rolled or flat hems. The rolled-hem foot has a round groove on the bottom and creates a rolled hem. The groove on the flat hem produces a narrow flat hem. Both feet work in a similar way and come in several sizes. The 2mm rolledhem foot makes a finished hem that is 1/16 inch wide on sheer fabrics. Choose this sewing machine-made hem to add a delicate finished edge to sheer fabrics, bridal veiling and other lightweight fabrics.
Either sewing machine foot is also a good choice for hemming yards and yards of fabric for ruffles and for finishing scarf edges. Both work in a similar fashion — as you feed the fabric into the scroll in front, it rolls the edge and straight stitches secure the roll.
Refer to Figure 10 and read through the steps below. Then practice on fabric scraps to learn how to guide the fabric into the sewing machine foot for best results. Use a soft thread for rolled edges to further enhance the soft edge.
- Choose the sewing machine foot for the desired finished width (2–6mm).
- Trim any excess hem allowance away, leaving a 1/4-inch seam allowance for the fine rolled hem. For flat hems, measure the bottom groove on the foot and multiply that width by two to determine how wide the hem allowance should be.
- Attach the rolled-hem foot to your sewing machine.
- If you are hemming a circular edge, undo the stitching in one seam for a few inches so you can begin the hem at an edge and finish sewing the seam after the hemming is complete.
- To begin the hem, turn and fingerpress a narrow double hem for about 2 inches at the beginning of the edge to be hemmed.
- Insert the folded edge into the scroll on the top of the sewing machine foot, hold the thread ends in back of the foot and start stitching slowly (Figure 10). Use your fingers to guide the hem edge into the scroll and continue stitching to the end.
10 HOW TO SEW A DESIGNER ROLLED HEM
This narrow hem is sometimes called the “Calvin Klein hem.” It’s quick and easy and best suited to light- to medium-weight silks, polyester silkies, cottons and rayons. Use it on either bias or straight edges. If you don’t have a serger, the designer rolled hem is the perfect substitute for the double serged and stitched hem. Thread the sewing machine with rayon or cotton embroidery thread for the softest finish. Refer to Figure 11. If available, attach an edgestitch sewing machine foot to help guide the fabric edge for even stitching.

- Trim the hem allowance to 5/8 inch if necessary.
- Turn under and press only 3/8 inch of the hem allowance. Machine-stitch 1/8 inch from the turned-and-pressed edge (a).
- Trim the hem allowance close to the stitching (b).
- Turn the stitched edge again and edgestitch (c).
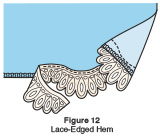
11 HOW TO SEW A LACE-EDGED HEM
If you enjoy sewing lingerie, evening wear or romantic dresses and separates, you’ll find this hem is an easy way to add pretty detail.
- Trim the hem allowance away so that when the lace is added, the project will be the desired finished length. Serge- or zigzag-finish the raw edge.
- Lap scalloped lace galloon edging over the finished edge and topstitch along the upper edge of the lace (Figure 12).
12 HOW TO SEW A SHELL-STITCHED HEM
The shell hem is a popular choice for lingerie hems, adding a softly scalloped detail. Test the stitch settings on fabric scraps first after reading through the following steps. Refer to Figure 13.
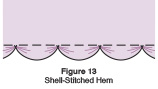
- Attach the sewing machine’s zigzag presser foot and select the built-in blindstitch; mirror image the stitch. On newer sewing machines, you may have a picot stitch that is oriented in the correct direction. Check your manual.
- Trim the hem allowance to 5/8 inch wide and turn under.
- Working with the right side facing up, blindstitch over the turned edge so that the zigzag stitch does not catch the edge but rather draws it up to create the lightly scalloped effect.
Note: If you have a built-in blindstitch but are unable to mirror-image it, you will need to sew with the turned edge to the left of the presser foot.
Because the sewing machines we use today are so versatile and full of features and special stitches, it seems as if there’s always something new to learn. After you’ve mastered these methods for machine-stitched hems, check the sewing machine’s manual to discover additional ways to stitch functional and decorative hems by machine.

10 Responses to How to Sew 12 Quick Hems by Machine by Peggy Bendel